

Dental Implants
Are You a Referring Doctor?
Imagine Smiling With Confidence Again
Case 1

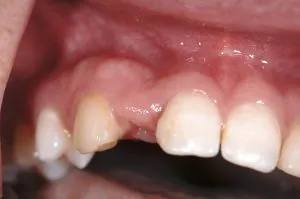
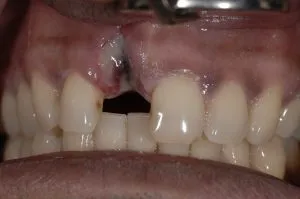
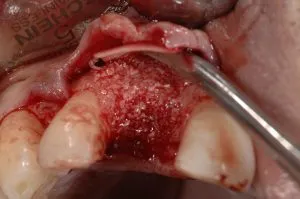
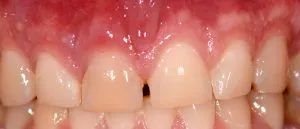
This man lost his central incisor secondary to trauma many years ago. The plan is for a single implant restoration

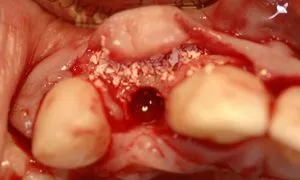
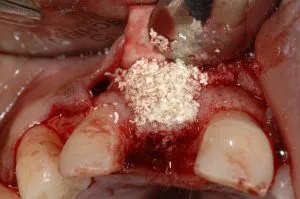
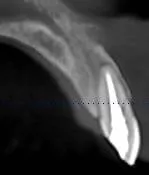
Because of the loss of bone width a graft was placed to augment the width of the missing tooth site.

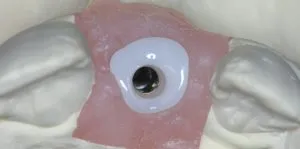
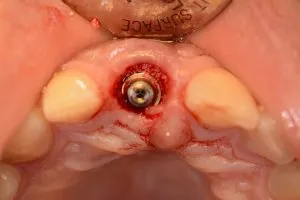
Four months after the implant was placed, an impression is taken

A temporary crown was made to sculpt the gingiva into a natural appearance.

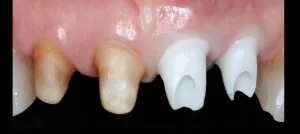
white abutment was placed into the implant to allow for a natural appearance without a darkening of the gingiva

A provisional crown was made to establish the final guidelines for the final crown

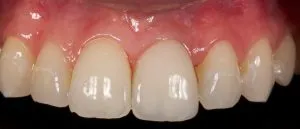
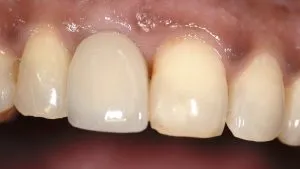
The final crown has a natural appearance

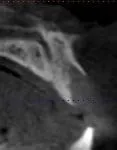
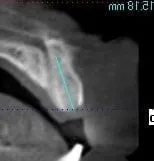
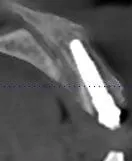
The final radiograph shows excellent appearance of the implant and adjacent bone.
Case 2
This 25 year old woman presents a congenitally missing maxillary right lateral incisor Note the ridge concavity. She has a high smile line
A small tissue flap was elevated and the implant site was prepared. Graft material was placed to correct the concave ridge deformity.

This is the healing abutment placed to shape the tissue prior to restoration.

A white abutment was made to optimize the color of the gingiva

This is the final restoration in place restoring her to a natural appearance.
Case 3

This 34 year old woman lost her central incisor secondary to trauma and subsequent external resorption of the tooth. The tooth was removed and a connective tissue placed to augment the thickness of the gingiva. She is now ready for implant placement

A duplicate of the plan for her final crown was used to fabricate a CAD/CAM static drill guide to allow for ideal placement of the implant.
The ct generated CAD/CAM static guide was used to place an implant replica into a master model. A custom healing abutment was made to at surgery the gingiva could be shaped into a natural appearance.

At the time of surgery no incisions were made. The implant was placed and the custom healing abutment placed immediately after implant placement into the bone

This is her first provisional crown prior to fabricating the final restorations
This is an 8 year follow-up of the crown. Note the natural appearance of the gingiva and the high esthetics of the ceramics.
Case 4

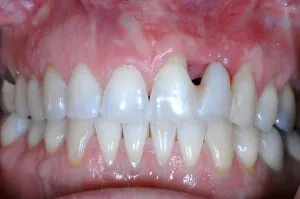
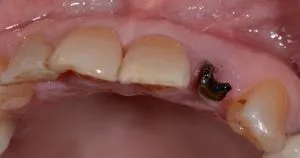
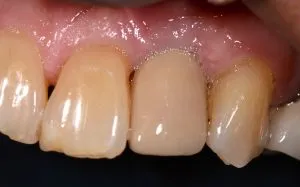
This 26 year old female presents with a fractured left central incisor. She has a high smile line and desires and esthetic result.

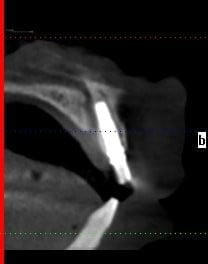
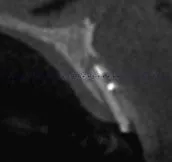
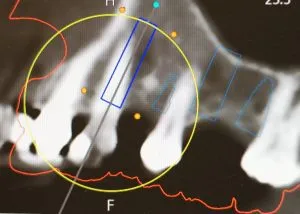
Her radiographs show thin bone on the lip side of the tooth, and a fracture through the tooth at the level of the bone.

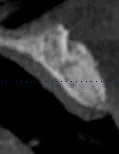
The first surgery included removal of the tooth, placement of a connective tissue graft to thicken the overlying gingiva, and placement of a graft into the socket to aid in bone formations.

After she healed from the grafting, a cone beam 3d scan was taken with the plan for the final tooth. This “dual scan” method allows for the fabrication of a static drill guide to allow for accurate placement of the implant.

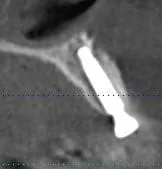
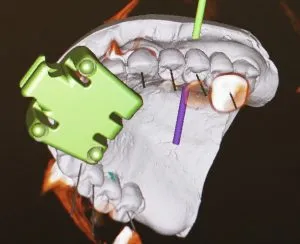
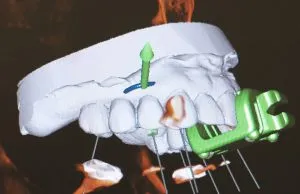
This is the plan made on the computer showing an implant within the bone with its emergence on the palatal side of the tooth for screw retention for the final restoration.

This is the static drill guide to optimize implant positioning.

At the time of surgery the implant is placed with no incisions. A temporary post is placed. Tooth forms are connected to the tooth colored abutment for fabrication of a temporary crown.

A provisional crown is made to simulate the specific form of the final crown. After the provisional crown has been in placed for the time needed for gingival healing, impressions can be taken for the final crown.

The final restoration restores her to a natural appearance.
Case 5

This woman presents with malposed teeth with moderate to severe periodontal disease and recurrent caries. She desires an esthetic set of teeth. She has a relatively high, youthful smile line

The left central and lateral incisors are not restorable. The gingival margin is apical to the ideal position. The remaining teeth are restorable.

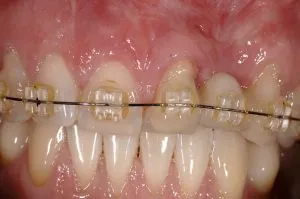
Prior to tooth removal, orthodontic eruption of the left incisors was performed to move the facial gingival margin inferiorly for an improvement in the final esthetic appearance. After the teeth were stabilized for a few months, they were removed and implants placed
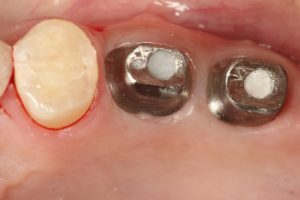
This photograph shows the implant abutments in place with the adjacent teeth prepared for crowns. Note the improvement in the gingival because of the orthodontic movement of the teeth.

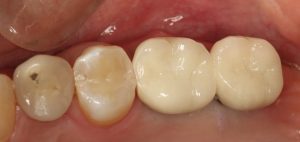
The final restoration has restored her to a functional, healthy and esthetic appearance.
Case 6

25 year old woman with history of trauma to her maxillary four incisors presents with failure of the left central and lateral incisors. She has a high smile line and desires an esthetic restoration

Her current crowns are opaque and not highly esthetic. There is significant root resorption on the left incisors.

The teeth were removed with minimal incisions. A soft tissue graft was obtained from her palate and placed under her gingiva to thicken the gingiva for a long lasting esthetic appearance. A graft was placed within the tooth sockets.

She wore a temporary prosthesis that were within a clear plastic retainer type material. She healed with excellent ridge form and esthetic appearing gingiva.

After determining the final plan for the teeth, a ct generated CAD/CAM guide stent was used to guide implant placement.

Prior to implant placement the guide stent was used to place implant replicas into the master model. A custom healing abutment was made to guide tissue healing.

These photos show the teeth prepared for crowns and also the abutments in the implant in preparation for the final prosthesis. The final prosthesis has established a functional, healthy, and esthetic set of teeth.

4 years later she lost the right central and lateral incisors. These photos show the new implant placed, the provisional bridge which has excellent esthetic form, and her new 4 unit fixed restoration on two implants.
Case 7

This woman presents with severely mobile teeth in her anterior maxilla from canine to canine. She desires a fixed set of teeth that do not move when she chews.

when smiling she show minimal upper teeth. For her the incisor edge of the teeth should be 2-3 mms longer than her current teeth.

Her current teeth are not symmetric and are yellow, misshapen, and malposed.

Her cone beam ct scan was entered into a ct planning software. Virtual teeth were superimposed on her current teeth lengthening them as needed.

Her current teeth were removed from the imaging to show the location of the planned set of teeth. Implants were then placed to emerge in a proper position and angulation.

This occlusal view show how software can be used to plan implant positioning to exacting standards.

At the time of surgery the six anterior teeth were removed and four implants placed as per the virtual plan.

This post-operative xray shows the new implants in the correct locations.

After healing she is ready for impressions and a new provisional set of teeth.

The first set of implant retained teeth is made in the laboratory using milled PMMA.

The milled PMMA provisional meets the expectations of the patient – who is very happy with the result.

This is the provisional prosthesis which she plans on wearing long term.. If it breaks a new one can be milled within a short period of time.
Case 8
The male was in a car accident and hit his upper jaw on the steering wheel and avulsed his central incisor, with loss of bone and a large gingival laceration.
This xray show the large bone defect after the tooth had been traumatically lost.

After his gingiva healed the bone defect was exposed and cleaned in preparation for grafting
Bone from bone bank was placed in the “socket” .
An additional layer of mineralized bovine xenograft was placed to maintain long term ridge form.
The is a 4 month post-graft cross section showing excellent results with restoration of ridge width and form

At the time of implant placement, an abutment was placed for an immediate provisional crown. This eliminated the need for a removable temporary which he did not like.

After 4 months a final crown was made. This xray shows excellent bone restoration.
Final crown in place. The patient plans on bleaching his teeth to match the new crown
4 year follow-up radiograph showing long term stability of the graft.
Case 9

This male patient lost three anterior teeth and bone in a traumatic event. Orthodontics was used to realign the teeth. An obvious ridge defect is present

A bone graft was performed using a xenograft (bovine) with the graft covered by a resorbable collagen membrane.

After the graft healed notice that the prior ridge defect has been reconstructed with esthetic appearing gingiva

This 3-dimensional CT scan image shows the graft in place

This is a provisional restoration which is used to shape the gingiva prior to final crown fabrication

The temporary teeth have shaped the gingiva into a normal appearance.

Tooth colored abutments are used to support a final cemented bridge to replace the three missing teeth. This photo is at the time of bridge placement

This photograph is an 8 year follow-up showing long term maintenance of the restoration and soft tissue.
Case 10
This woman desires correction of the esthetic appearance of her left lateral incisor site. Another dentist removed the left lateral incisor and placed an implant which was not stabile at placement. The implant failed and the dentist performed several grafting procedures resulting in loss of bone on the left central incisor with a horizontal bone defect in the lateral incisor site.
Orthodontic extrusion was performed on the left central incisor to move the soft tissues inferiorly for later implant placement.

After the central incisor had been erupted to provide better soft tissue height, the tooth was removed, an implant was placed with healing abutment, and a graft was placed into the horizontal defect in the lateral incisor site.

The incisions were closed with obvious improvement in the ridge contour
These are provisional crowns in place showing the improvement. A final restoration followed these provisionals.
Case 11

A patient edentulous in the maxilla for 10 years desires a set of teeth that do not have to be removed. He has funds for the implants placement and prosthetics but not for additional costs of an immediate fixed provisional.

A new denture was fabricated and used with fiducials for dual scan protocols. These images demonstrate adequate bone for a fixed provisional.

For a static guide, the image of the new denture was superimposed on the bone using planning software. Six implants are positioned within the bone. The anterior four can be paralleled to use straight emergence abutments. The posterior implants will require 30 degree angle correction abutments. This picture of the 3- dimensional image from the planning software shows the implants emerging from the bone.

The view of the planned prosthesis with the implants. The planning positioned the implants within the crowns of the teeth and allow for a prosthesis made of ceramics.

This occlusal view shows the planned position of the implants to allow for a screw retained prosthesis.

The planning software designs the surgical guide stent. This allows the surgeon to view its design prior to manufacture

This is the surgical guide stent fabricated by the dual scan virtual method.

This photo shows the surgical guide stent in position with the implants placed and pins securing the stent to the maxilla.

Implants have been placed and cover screws placed. This allows the patient to wear his denture during the healing period with minimal pressure placed on the implants. Notice that no incisions were made when placing the implants.

Reconstructed panoramic image showing implants placed as planned

This is the zirconia prosthesis immediately after milling.

Final prosthesis with staining for esthetics (laboratory work by Mr. Renzo Cassellini).

Occlusal view showing metal inserts to allow for metal to metal contact when screw retaining the prosthesis.

Occlusal view of prosthesis in mouth

Photo showing appropriate soft tissue support and tooth show. This patient is very happy. (Restorative dentist is Dr Laurie Glaser).
Case 12
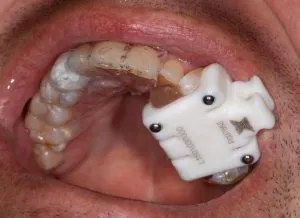
The dynamic navigation system requires a patient tracking array – here seen as the white clip with three small metallic bbs) – to register the cone beam ct scan, The ct scan with the clip is entered as digital data into the navigation computer for implant planning. A virtual implant is placed to have implant dimensions, depth, and angulation determined prior to surgery.

This photograph shows Dr. Block placing an implant using the X-Nav dynamic navigation system. The overhead blue light is reflected back from the surgical implant drill and patient tracking array to high-density cameras. The computer shows a real time image to allow accurate implant positioning

This diagram depicts the system. The overhead light is reflected back to the cameras which then allows for online, real time guidance for implant placement.
Case 13
This male fractured his right central incisor. Note the gingival inflammation over that tooth.
This radiograph shows the tooth to be removed and immediately replaced by an implant and provisional crown


These views show the virtual implant in position along the axis of the natural tooth but slightly towards the palate to allow for screw retention of the provisional and final restoration.

This is a cross section view of the planned implant position.

This is the view of the navigation screen showing the drill about to engage the implant site.
Using the navigation system the implant is properly positioned with the screw retained abutment in place. A small gap between the implant and the overlying bone was grafted to preserve ridge form.
This is a cross section of the implant taken immediately after surgery. Note how similar it is to the virtual plan.

This the patient 1 week after surgery with his provisional crown in place. The patient did not have to wear a removable prosthesis.

This xray shows the implant and crown in an ideal position because of the use of the dynamic X-Nav system
Case 14
This 75 year old male presented with a desire to have an implant placed in the left lateral incisor location. The tooth is fractured with loss of labial bone
A cone beam scan was taken with a fiducial clip on the right maxillary teeth. This cross-section image from the cone beam shows lack of bone and the obvious need for a graft to restore ridge width. At the time of tooth removal a flap was elevated and the tooth removed. Allograft was placed into site confluent with the adjacent bone. A 2 mm layer of xenograft was placed to prevent severe resorptive changes since sintered xenograft will minimally resorb.
A second scan with the original fiducial containing clip was taken after 4 months. This image shows the restored ridge form

The digital file from the second cone beam scan was imported into navigation computer. A virtual lateral incisor crown was positioned, followed by placement of a virtual implant emerging according to the virtual crown placement.

This cross section image from the navigation screen shows the virtual implant position with at least 2 mm of graft labial to the implant with the implant emerging in the position agreed to by the restorative dentist. He plans to place a cemented crown.
Navigation was used to place the implant. The incision did include a small palatal flap with no labial reflection to protect the graft. A mesh analysis was performed confirming less than 1 degree of divergence from the virtual plan.

This is a two year follow-up radiograph showing the maintenance of bone around the implant.
This is a 2 year follow-up of the crown with an adequate band of keratinized gingiva which allows for tissue health long term.
Case 15

This patient presents with a premolar tooth in need of removal. The root size and close proximity to the maxillary sinus required a staged approach

The tooth was removed and a graft placed into the socket. After 4 months of healing she was ready for the implant placement

The X-Nav dynamic navigation system was used to guide implant placement. A virtual implant was placed onto the cone beam ct scan. The size of the implant was accurately predetermined as well as alignment

This is a screen shot of the navigation system when placing the implant. Note the drill where the implant location is desires, within 1 degree of deviation.

These post implant placement radiographs confirm accurate positioning of the implant similar to the virtual plan.

The virtual plan is on the left and the actual placement is on the right. The accuracy of implant placement allows the restorative dentist the ability to restore the implant with minimal problems, which is in the best interest of our patients.
Case 16

This woman desires to smile again. She is missing multiple teeth and they are not well aligned. She does not tolerate a removable partial denture.

Her xray indicates satisfactory bone levels for implants

Models of her upper and lower teeth were sent to a dental laboratory and a waxup of the planned set of new teeth was created. This setup of the planned teeth will be used to guide implant planning.

The laboratory technician (Lars Hanson, CDT) scanned the model to create a 3-dimensional image of the plan. This .stl file was superimposed on the planning software to allow for visualization of the position of the new planned teeth to the originals.

Using the planned set of teeth and the digital scan of the model, a temporary set of teeth were milled from a block of tooth colored acrylic.
The 3-dimensional scan was superimposed onto the ct scan within the X-Nav navigation system to visualize the position of the planned set of teeth to the underlying bone. Implants were then virtually positioned with th
This view shows the virtual implant in position. Note how the planned setup of the new teeth has the implants in a different position compared to her current malposed teeth.

This cross section shows the virtual tooth aligned with the planned tooth to place it in an ideal restorable position.

The implant in the right posterior molar location is intentionally angled to avoid the sinus. By using the planned setup it can be angled to emerge in an appropriate position. The navigation system allows for implant placement without excessive tissue reflection, resulting in less swelling for the patient.

This is a screenshot of the actual navigation surgery showing the accurate positioning of the implants according to the planning.

This post-operative radiograph shows the implants in their planned locations.

After the implants were placed, abutments were screwed into the implant and the provisional set of teeth were connected to the implants via a retentive coping. The teeth were then adjusted accordingly.

These are the provisional set of teeth after polishing. They will be secured to the implants by screws.

The patient leaves the office with this set of teeth.

These views are four months later with an excellent acceptance of the provisionals.

The final set of teeth are made with zirconium and have re-established function and esthetics.
Case 17


This woman requires removal of the maxillary left first molar (#14). She is also missing the second molar (#15). She has 5.6 mm of bone thickness.

The first molar was carefully removed. A piezosurgery bit was used to cut between the roots of the teeth. The bone between the roots was mobilized.

The bone was gently tapped superiorly to allow for a graft to be placed which will increase the vertical height of the bone for later implant placement.

The same procedure was performed in the second molar site. Here are cross section radiographs showing an increase in bone height.

Models were used to set teeth. A clear vacuum form was made over the setup. Radiopaque resin was placed to form the teeth within the vacuum form. Holes were then drilled in the desired locations for the implant emergence.

The patient had a cone beam scan taken with the guide stent in the mouth. The virtual implant was then placed to emerge through the holes, insuring ideal implant positioning.

The implant was placed to engage the sinus floor with ideal positioning.
Custom designed abutments were fabricated
Occlusal view of the final restoration

Follow up radiograph showing excellent bone levels around the implants